
How to Read a Full Dealer Cycle in Forex (Step by Step)
- Erica Lorrai

- Sep 30, 2025
- 3 min read
Ever stare at a chart, feel like something bigger is playing out, but can’t quite piece it together? This EURUSD sequence is your answer: a textbook dealer cycle, laid out in four clean boxes. Let’s break it down move by move, pattern by pattern, so you can finally see how the game is played from start to finish.

1️⃣ Reset Box: The Trap + Wrong Way Move
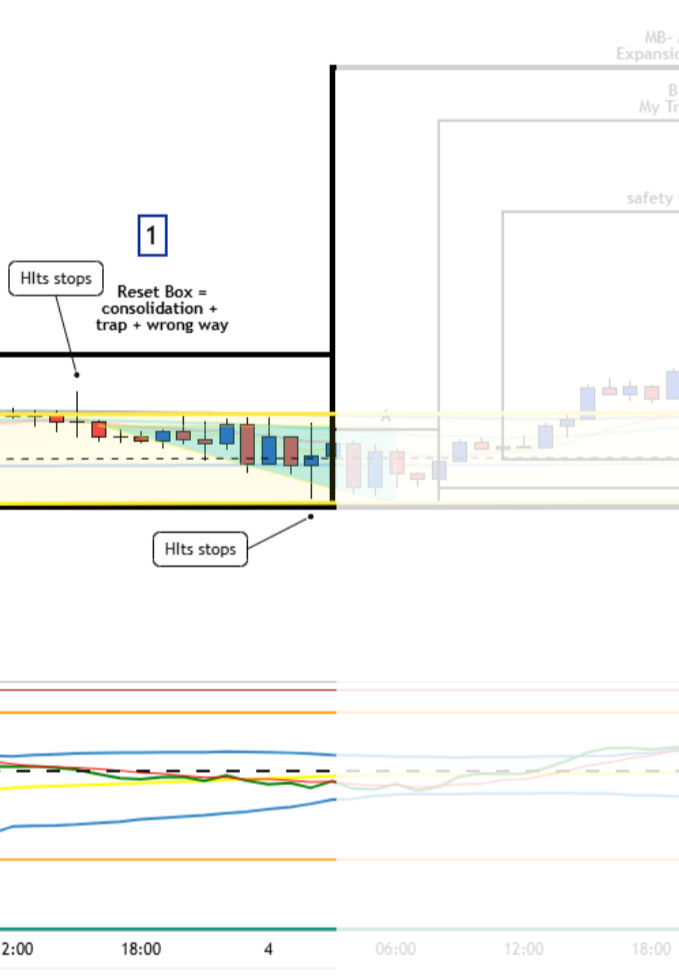
This is where the cycle begins. The Dealer's Cycle starts with consolidation—a tight range that gets traders bored and guessing. Then comes the wrong-way push (short): a fake breakout that clears stops and convinces retail to pile in the wrong direction.
Dealer Intention: Accumulate positions while retail traders panic or chase.
Key Tell: That wick through the yellow zone = stops cleared.
Patterns inside:
A.2 – Monday Reset (Long)
Stop Hunt Fakeout
Lesson: When you see a boring box suddenly fake-break, don’t chase it. The real move is usually the other way.
2️⃣ Markup Box: Expansion Leg (L1/L2 Rise)
Once stops are cleared, dealers light the rocket. This is the expansion phase—price finally moves with conviction. You’ll see an explosive breakout candle, followed by a clean run.

A = Trigger: The breakout spike that “starts” the move.
B = Continuation (Safety Trade): The middle of the leg, safest entry point.
C = Exhaustion: The third push or blow-off wick that signals topping.
Dealer Intention: Deliver profit on the positions they stacked during reset.
Patterns inside:
B.1 – Safety Trade (Long)
C.3 – Momentum Pump (Long)
Half Batman (on the topping wick)
Lesson: The best trades aren’t in the breakout candle—they’re in the B continuation zone once price confirms the trend.
3️⃣ Distribution Box: Topping Formation (3 Push High)
Now the music slows down. Price grinds higher, but notice the rhythm: three distinct pushes to the top. This is the dealer’s way of distributing positions—offloading longs while trapping late buyers into chasing the top.

A = Trigger: The fake dip or retest into the top.
B = Continuation: Small continuation trades still tempt buyers.
C = Exhaustion: Final push, usually the third hit.
Dealer Intention: Hand off longs to retail, prep shorts.
Patterns inside:
G.1 – Three Tap Trap (Top)
Stair Step Chop (inside continuation)
C.1 – Exhaustion Into Reversal
Lesson: When you see three clean pushes to a high with no follow-through, it’s not strength—it’s distribution. Prepare for reversal.
4️⃣ Markdown Box: The Reversal Leg Down

Here’s where the cycle flips. After trapping buyers at the highs, dealers reverse the market and drive price down.
A = Trigger: A fake retrace up, often into EMAs.
B = Continuation: Clean downside leg (the safest short entry).
C = Exhaustion: A final flush candle that signals the leg is done.
Dealer Intention: Profit on shorts while retail is stuck holding longs.
Patterns inside:
A.1 – L3 Trap Reversal (Short)
D.1 – Anchor + Reentry (Short)
👉 Lesson: The reversal always looks “too late” to enter, but the middle (B) is where the cleanest money is made.
The Big Picture: A Full Forex Dealer Cycle
When you zoom out, the entire chart is one textbook dealer cycle:

Reset (Box 1) → stops cleared, wrong-way trap.
Markup (Box 2) → expansion leg with safety trade.
Distribution (Box 3) → 3 pushes, topping pattern.
Markdown (Box 4) → reversal leg back down.
This is the Peak Formation Cycle in action. Dealers rinse and repeat this structure over and over. Once you can spot it, the market stops looking random—and starts looking like a rigged casino running the same script every night.
Pattern Checklist from This Chart
Here’s every nameable setup we pulled from this one cycle:
A.2 – Monday Reset (Long)
Stop Hunt Fakeout
B.1 – Safety Trade (Long)
C.3 – Momentum Pump (Long)
Half Batman (Exhaustion Wick)
G.1 – Three Tap Trap (Top)
Stair Step Chop (Continuation)
C.1 – Exhaustion Into Reversal
A.1 – L3 Trap Reversal (Short)
D.1 – Anchor + Reentry (Short)
Vegas Move (Sharp Leg)
Whole thing = Full Dealer Cycle (Peak Formation Rise → Top → Fall).
Key Takeaways for Traders
Don’t get caught in Box 1 (the trap).
Enter in Box 2B (Safety Trade zone).
Exit or reverse after Box 3 (3 pushes high).
Re-enter in Box 4B (Reversal continuation).
When you start to recognize these boxes, the chart stops being “noise” and starts being a map of the dealer’s playbook.
And now you know the entire forex dealer cycle.

Comments